Подключение датчика ds18b20 к Arduino
- Подробности
- Категория: Arduino
- Опубликовано 29.11.2013 14:41
- Автор: Admin
- Просмотров: 31876
Довольно часто в проектах на Arduino возникает необходимость в и измерении температуры. Вот и у меня настал тот день, когда мне нужно было срочно измерить температуру. Дома валялись датчики ds18b20, и я долго не думая решил их подключить. Хотел не вдаваясь в детали как происходит передача данных, как работают защелки датчика и т.д. найти простую и понятную инструкцию по подключению датичика ds18b20, Но к моему удивлению я такой инструкции не нашел.
Есть куча информации про то как работает с библиотекой Wire, есть много инфы про принцип работы самого датчика с его схемой и т.д. Cкопировал пару примеры залил на Arduino но долгожданый циферок в миноторинге порта не оказалось.
А если вы новичок то тоже столкнётесь с такими проблемами. Решил подойти к этому вплотную и написать понятную для новичков инструкция по подключению цифрового датчика ds18b20 к Arduino.
Основные параметры датчика:
- Температурный диапазон измерения температуры от -55 до +125 С;
- Точность в диапазоне от -10 до +85 С составляет 0.5C;
- Напряжение питания от 3 до 5В;
- Адресация осуществляется с помощью 64-битного идентификационного кода;
- Возможность работы нескольких датчиков на одной шине.
Цифровой датчик ds18b20 имеет 3 вывода:
- линию данных, D;
- плюс питания, VCC;
- минус питания, GND.
Линия данных используется для обмена информацией между контроллером и датчиком. Данный датчик использует протокол 1-Wire. Информация о температуре датчика хранится в оперативной памяти, состоящей из слова длиной 9 байт.
Для того чтобы измерить температуру с помощью цифрового датчика ds18b20 и Arduino нам нужно сделать следующее:
- Сначала собрать схему;
- Скачать библиотеку OneWire;
- Открыть готовый пример в среде Arduino;
- Наслаждаться показаниями датчика.
Расположение выводов датчика.
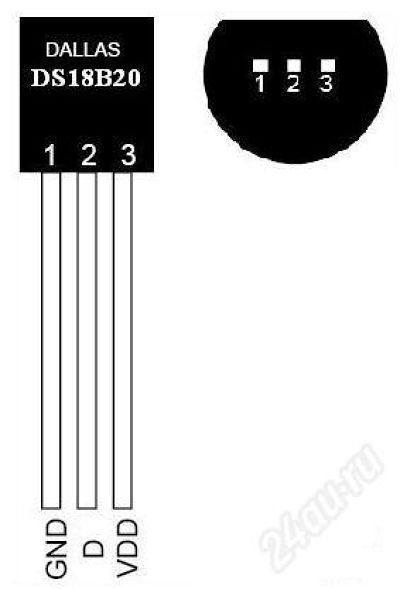
Схема подключения датчика
Схема подключения довольно простая. Она состоит из трех проводной линии, два крайних это питание а третий это линия данных. Линия данных «подтянута » к 5 В. Сопротивлением 4.7 кОм. У меня была плата Arduino Mega.
Для того чтобы получать данные с датчика, как было сказано ранее, используеться протокол 1-wire. Датчик можно подключить к любому выводу Arduino, но предварительно нужно указать в коде программы с каким именно выводом мы имеем дело. В нашем мы подключаем к выводу 20.
Скачиваем библиотеку
Скачать библиотеку OneWire.zip
Открываем готовый проект в Arduino
Для того чтобы начать работать с этой ранее скаченной библиотекой ее необходимо добавить в среду arduino. В каком то пункте меню есть пункт add library. после ее добавления в примерах ардино появится примеры OneWire. Открываем его и видим следующий код.
Важно! В коде я поменял OneWire ds(10) на OneWire ds(20) так как в ArduinoMega выход на 20-й ноге.
#include OneWire  ds(10);  // on pin 10 (a 4.7K resistor is necessary)

void setup(void) {
  Serial.begin(9600);
}
void loop(void) {
  byte i;
  byte present = 0;
  byte type_s;
  byte data[12];
  byte addr[8];
  float celsius, fahrenheit;

  if ( !ds.search(addr)) {
    Serial.println("No more addresses.");
    Serial.println();
    ds.reset_search();
    delay(250);
    return;
  }

  Serial.print("ROM =");
  for( i = 0; i < 8; i++) {
    Serial.write(' ');
    Serial.print(addr[i], HEX);
  }
  if (OneWire::crc8(addr, 7) != addr[7]) {
      Serial.println("CRC is not valid!");
      return;
  }
  Serial.println();

  // the first ROM byte indicates which chip
  switch (addr[0]) {
    case 0x10:
      Serial.println("  Chip = DS18S20");  // or old DS1820
      type_s = 1;
      break;
    case 0x28:
      Serial.println("  Chip = DS18B20");
      type_s = 0;
      break;
    case 0x22:
      Serial.println("  Chip = DS1822");
      type_s = 0;
      break;
    default:
      Serial.println("Device is not a DS18x20 family device.");
      return;
  }
  ds.reset();
  ds.select(addr);
  ds.write(0x44, 1);        // start conversion, with parasite power on at the end

  delay(1000);     // maybe 750ms is enough, maybe not
  // we might do a ds.depower() here, but the reset will take care of it.

  present = ds.reset();
  ds.select(addr);
  ds.write(0xBE);         // Read Scratchpad
  Serial.print("  Data = ");
  Serial.print(present, HEX);
  Serial.print(" ");
  for ( i = 0; i < 9; i++) {           // we need 9 bytes
    data[i] = ds.read();
    Serial.print(data[i], HEX);
    Serial.print(" ");
  }
  Serial.print(" CRC=");
  Serial.print(OneWire::crc8(data, 8), HEX);
  Serial.println();
  // Convert the data to actual temperature
  // because the result is a 16 bit signed integer, it should
  // be stored to an "int16_t" type, which is always 16 bits
  // even when compiled on a 32 bit processor.
  int16_t raw = (data[1] << 8) | data[0];
  if (type_s) {
    raw = raw << 3; // 9 bit resolution default
    if (data[7] == 0x10) {
      // "count remain" gives full 12 bit resolution
      raw = (raw & 0xFFF0) + 12 - data[6];
    }
  } else {
    byte cfg = (data[4] & 0x60);
    // at lower res, the low bits are undefined, so let's zero them
    if (cfg == 0x00) raw = raw & ~7;  // 9 bit resolution, 93.75 ms
    else if (cfg == 0x20) raw = raw & ~3; // 10 bit res, 187.5 ms
    else if (cfg == 0x40) raw = raw & ~1; // 11 bit res, 375 ms
    //// default is 12 bit resolution, 750 ms conversion time
  }
  celsius = (float)raw / 16.0;
  fahrenheit = celsius * 1.8 + 32.0;
  Serial.print("  Temperature = ");
  Serial.print(celsius);
  Serial.print(" Celsius, ");
  Serial.print(fahrenheit);
  Serial.println(" Fahrenheit");
}
Код на языке Processing
import processing.serial.*;

float theta;
Serial myPort;  // Create object from Serial class
int val;      // Data received from the serial port

void setup()
{
  size(800, 600);
  // I know that the first port in the serial list on my mac
  // is always my  FTDI adaptor, so I open Serial.list()[0].
  // On Windows machines, this generally opens COM1.
  // Open whatever port is the one you're using.
  String portName = Serial.list()[1];
  myPort = new Serial(this, portName, 9600);
}

void draw()
{
background(255);if ( myPort.available() > 0)

    val = myPort.read();
  background(0);
  frameRate(30);
  stroke(255);
  // Let's pick an angle 0 to 90 degrees based on the mouse position
  float a = ((val*2) / (float) width) * 90f;
  // Convert it to radians
  theta = radians(a);
  // Start the tree from the bottom of the screen
  translate(width/2,height);
  // Draw a line 120 pixels
  line(0,0,0,-120);
  // Move to the end of that line
  translate(0,-120);
  // Start the recursive branching!
  branch(220);

}

void branch(float h) {
  // Each branch will be 2/3rds the size of the previous one
  h *= 0.66;
    // All recursive functions must have an exit condition!!!!
  // Here, ours is when the length of the branch is 2 pixels or less
  if (h > 2) {
    pushMatrix();    // Save the current state of transformation (i.e. where are we now)
    rotate(theta);   // Rotate by theta
    line(0, 0, 0, -h);  // Draw the branch
    translate(0, -h); // Move to the end of the branch
    branch(h);       // Ok, now call myself to draw two new branches!!
    popMatrix();     // Whenever we get back here, we "pop" in order to restore the previous matrix state
    // Repeat the same thing, only branch off to the "left" this time!
    pushMatrix();
    rotate(-theta);
    line(0, 0, 0, -h);
    translate(0, -h);
    branch(h);
    popMatrix();
  }

}
Наслаждаемся показаниями датчика
Цифровые данные полученные от Arduino в данном видео обрабатываются с помощью языка Processing.
Категории
Полезные ссылки!
Справочные данные
Форма входа
Группа в ВК
Самые читаемые
- Схема металлоискателя пират
- Маркировка конденсаторов
- Трансформатор тесла своими руками. Как сделать трансформатор Тесла
- Простой усилитель звука
- Для чего нужен выключатель нагрузки? Совет от Electrolight
- Как работает транзистор?
- Схема простейшего радиоприемника
- Маркировка SMD транзисторов
- Подключение электретного микрофона
- Простой блок питания
Последние комментарии
-
Металлоискатель бабочка
-
27.05.2019 07:31
Из личного опыта: Количество витков катушек следует уменьшить. Максимальная чувствительност ь 15 см 5 ...
-
27.05.2019 07:31
-
Справочник отечественных диодов
-
30.05.2019 23:17
Очень понравилось. Всё удобно и доступно.
-
30.05.2019 23:17
-
Ультразвуковой дальномер, динамическая индикация и Arduino.
-
14.03.2019 12:18
А схемы подключения на fritzing есть? Подробного описания нет
-
14.03.2019 12:18
Последние материалы
Последнии темы форума
- Нет сообщений для показа
Новости радиомира
-
Арматура 6 мм: Применение, преимущества и советы по выбору
-
Важность инженерно-геодезических изысканий в строительных проектах
-
Миниатюрный радиоприемник на основе графена
-
Покупка Квартиры в Анжеро-Судженске: Инвестиция в Комфорт и Уют
-
Сад падающих звёзд: Тайваньская дорама, покорившая сердца зрителей по всему миру
-
Саранск: История, Культура и Жилье в Современном Городе
-
Что такое роялти во франшизе простыми словами
Комментарии
только у меня цветка нет на. Экране откуда ты его скачал?
В стандартных примерах среды Processing есть примеры.
Файл>examples>Books>Nature of code>chp8_fractal>NOC_8_04_Tree
Отпишись что получиться,инте ресно посмотреть
https://vk.com/arduino_shop